GitHub
Wasp supports GitHub Authentication out of the box. GitHub is a great external auth choice when you're building apps for developers, as most of them already have a GitHub account.
Letting your users log in using their GitHub accounts turns the signup process into a breeze.
Let's walk through enabling GitHub Authentication, explain some of the default settings, and show how to override them.
Setting up GitHub Auth
Enabling GitHub Authentication comes down to a series of steps:
- Enabling GitHub authentication in the Wasp file.
- Adding the
Userentity. - Creating a GitHub OAuth app.
- Adding the necessary Routes and Pages
- Using Auth UI components in our Pages.
Here's a skeleton of how our main.wasp should look like after we're done:
// Configuring the social authentication
app myApp {
  auth: { ... }
}

// Defining routes and pages
route LoginRoute { ... }
page LoginPage { ... }
1. Adding GitHub Auth to Your Wasp File
Let's start by properly configuring the Auth object:
app myApp {
  wasp: {
    version: "^0.17.0"
  },
  title: "My App",
  auth: {
    // 1. Specify the User entity  (we'll define it next)
    userEntity: User,
    methods: {
      // 2. Enable GitHub Auth
      gitHub: {}
    },
    onAuthFailedRedirectTo: "/login"
  },
}
2. Add the User Entity
Let's now define the app.auth.userEntity entity in the schema.prisma file:
// 3. Define the user entity
model User {
  id Int @id @default(autoincrement())
  // Add your own fields below
  // ...
}
3. Creating a GitHub OAuth App
To use GitHub as an authentication method, you'll first need to create a GitHub OAuth App and provide Wasp with your client key and secret. Here's how you do it:
- Log into your GitHub account and navigate to: https://github.com/settings/developers.
- Select New OAuth App.
- Supply required information.
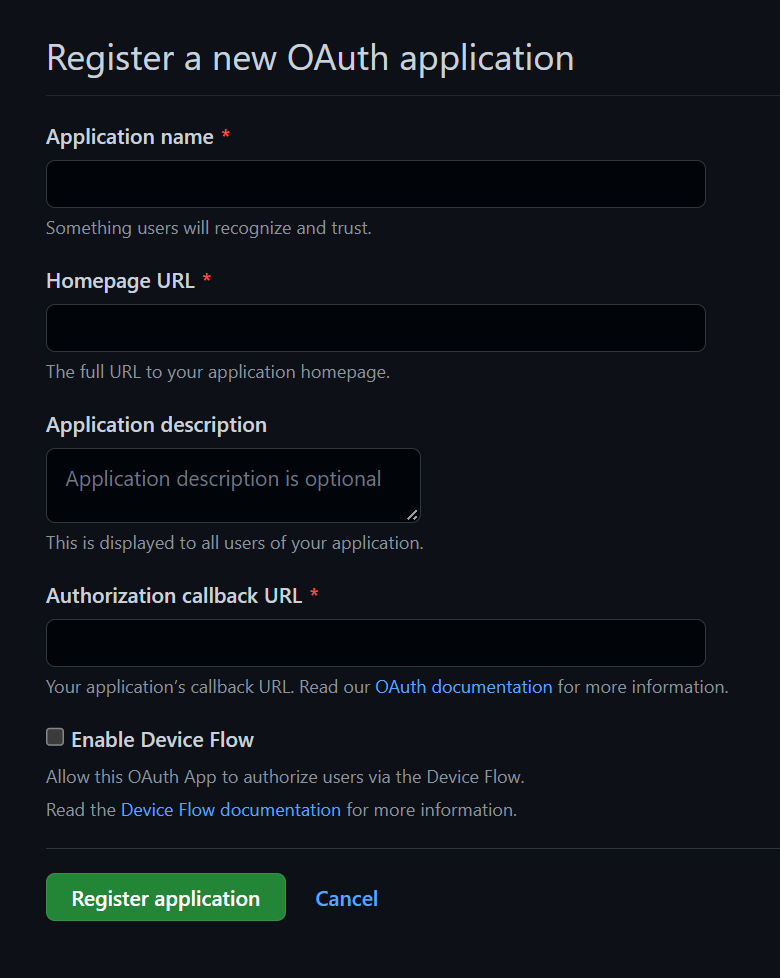
- For Authorization callback URL:
- For development, put:
http://localhost:3001/auth/github/callback. - Once you know on which URL your API server will be deployed, you can create a new app with that URL instead e.g.
https://your-server-url.com/auth/github/callback.
- For development, put:
- Hit Register application.
- Hit Generate a new client secret on the next page.
- Copy your Client ID and Client secret as you'll need them in the next step.
4. Adding Environment Variables
Add these environment variables to the .env.server file at the root of your project (take their values from the previous step):
GITHUB_CLIENT_ID=your-github-client-id
GITHUB_CLIENT_SECRET=your-github-client-secret
5. Adding the Necessary Routes and Pages
Let's define the necessary authentication Routes and Pages.
Add the following code to your main.wasp file:
// ...

route LoginRoute { path: "/login", to: LoginPage }
page LoginPage {
  component: import { Login } from "@src/pages/auth"
}
We'll define the React components for these pages in the src/pages/auth.tsx file below.
6. Creating the Client Pages
We are using Tailwind CSS to style the pages. Read more about how to add it here.
Let's create a auth.tsx file in the src/pages folder and add the following to it:
- JavaScript
- TypeScript
import { LoginForm } from "wasp/client/auth";

export function Login() {
  return (
    <Layout>
      <LoginForm />
    </Layout>
  );
}

// A layout component to center the content
export function Layout({ children }) {
  return (
    <div className="h-full w-full bg-white">
      <div className="flex min-h-[75vh] min-w-full items-center justify-center">
        <div className="h-full w-full max-w-sm bg-white p-5">
          <div>{children}</div>
        </div>
      </div>
    </div>
  );
}
import type { ReactNode } from "react";
import { LoginForm } from "wasp/client/auth";

export function Login() {
  return (
    <Layout>
      <LoginForm />
    </Layout>
  );
}

// A layout component to center the content
export function Layout({ children }: { children: ReactNode }) {
  return (
    <div className="h-full w-full bg-white">
      <div className="flex min-h-[75vh] min-w-full items-center justify-center">
        <div className="h-full w-full max-w-sm bg-white p-5">
          <div>{children}</div>
        </div>
      </div>
    </div>
  );
}
We imported the generated Auth UI components and used them in our pages. Read more about the Auth UI components here.
Conclusion
Yay, we've successfully set up GitHub Auth! 🎉

Running wasp db migrate-dev and wasp start should now give you a working app with authentication.
To see how to protect specific pages (i.e., hide them from non-authenticated users), read the docs on using auth.
Default Behaviour
Add gitHub: {} to the auth.methods dictionary to use it with default settings.
app myApp {
  wasp: {
    version: "^0.17.0"
  },
  title: "My App",
  auth: {
    userEntity: User,
    methods: {
      gitHub: {}
    },
    onAuthFailedRedirectTo: "/login"
  },
}
When a user signs in for the first time, Wasp creates a new user account and links it to the chosen auth provider account for future logins.
Overrides
By default, Wasp doesn't store any information it receives from the social login provider. It only stores the user's ID specific to the provider.
There are two mechanisms used for overriding the default behavior:
userSignupFieldsconfigFn
Let's explore them in more detail.
Data Received From GitHub
We are using GitHub's API and its /user and /user/emails endpoints to get the user data.
You'll find the emails in the emails property in the object that you receive in userSignupFields.
This is because we combine the data from the /user and /user/emails endpoints if the user or user:email scope is requested.
The data we receive from GitHub on the /user endpoint looks something this:
{
  "login": "octocat",
  "id": 1,
  "name": "monalisa octocat",
  "avatar_url": "https://github.com/images/error/octocat_happy.gif",
  "gravatar_id": ""
  // ...
}
And the data from the /user/emails endpoint looks something like this:
[
  {
    "email": "octocat@github.com",
    "verified": true,
    "primary": true,
    "visibility": "public"
  }
]
The fields you receive will depend on the scopes you requested. By default we don't specify any scopes. If you want to get the emails, you need to specify the user or user:email scope in the configFn function.
For an up to date info about the data received from GitHub, please refer to the GitHub API documentation.
Using the Data Received From GitHub
When a user logs in using a social login provider, the backend receives some data about the user.
Wasp lets you access this data inside the userSignupFields getters.
For example, the User entity can include a displayName field which you can set based on the details received from the provider.
Wasp also lets you customize the configuration of the providers' settings using the configFn function.
Let's use this example to show both fields in action:
app myApp {
  wasp: {
    version: "^0.17.0"
  },
  title: "My App",
  auth: {
    userEntity: User,
    methods: {
      gitHub: {
        configFn: import { getConfig } from "@src/auth/github",
        userSignupFields: import { userSignupFields } from "@src/auth/github"
      }
    },
    onAuthFailedRedirectTo: "/login"
  },
}
model User {
  id          Int    @id @default(autoincrement())
  username    String @unique
  displayName String
}

// ...
- JavaScript
- TypeScript
import { defineUserSignupFields } from "wasp/server/auth";

export const userSignupFields = defineUserSignupFields({
  username: () => "hardcoded-username",
  displayName: (data) => data.profile.name,
});

export function getConfig() {
  return {
    scopes: ["user"],
  };
}
import { defineUserSignupFields } from "wasp/server/auth";

export const userSignupFields = defineUserSignupFields({
  username: () => "hardcoded-username",
  displayName: (data: any) => data.profile.name,
});

export function getConfig() {
  return {
    scopes: ["user"],
  };
}
Wasp automatically generates the defineUserSignupFields function to help you correctly type your userSignupFields object.
Using Auth
To read more about how to set up the logout button and get access to the logged-in user in both client and server code, read the docs on using auth.
When you receive the user object on the client or the server, you'll be able to access the user's GitHub ID like this:
const githubIdentity = user.identities.github

// GitHub User ID for example "12345678"
githubIdentity.id
Read more about accessing the user data in the Accessing User Data section of the docs.
API Reference
Provider-specific behavior comes down to implementing two functions.
configFnuserSignupFields
The reference shows how to define both.
For behavior common to all providers, check the general API Reference.
app myApp {
  wasp: {
    version: "^0.17.0"
  },
  title: "My App",
  auth: {
    userEntity: User,
    methods: {
      gitHub: {
        configFn: import { getConfig } from "@src/auth/github",
        userSignupFields: import { userSignupFields } from "@src/auth/github"
      }
    },
    onAuthFailedRedirectTo: "/login"
  },
}
The gitHub dict has the following properties:
-
configFn: ExtImportThis function should return an object with the scopes for the OAuth provider.
- JavaScript
- TypeScript
src/auth/github.jsexport function getConfig() {
return {
scopes: [],
};
}src/auth/github.tsexport function getConfig() {
return {
scopes: [],
};
} -
userSignupFields: ExtImportuserSignupFieldsdefines all the extra fields that need to be set on theUserduring the sign-up process. For example, if you haveaddressandphonefields on yourUserentity, you can set them by defining theuserSignupFieldslike this:- JavaScript
- TypeScript
src/auth.jsimport { defineUserSignupFields } from "wasp/server/auth";
export const userSignupFields = defineUserSignupFields({
address: (data) => {
if (!data.address) {
throw new Error("Address is required");
}
return data.address;
},
phone: (data) => data.phone,
});src/auth.tsimport { defineUserSignupFields } from "wasp/server/auth";
export const userSignupFields = defineUserSignupFields({
address: (data) => {
if (!data.address) {
throw new Error("Address is required");
}
return data.address;
},
phone: (data) => data.phone,
});Read more about the
userSignupFieldsfunction here.