Introduction
If you are looking for the installation instructions, check out the Quick Start section.
We will give a brief overview of what Wasp is, how it works on a high level and when to use it.
Wasp is a tool to build modern web applications
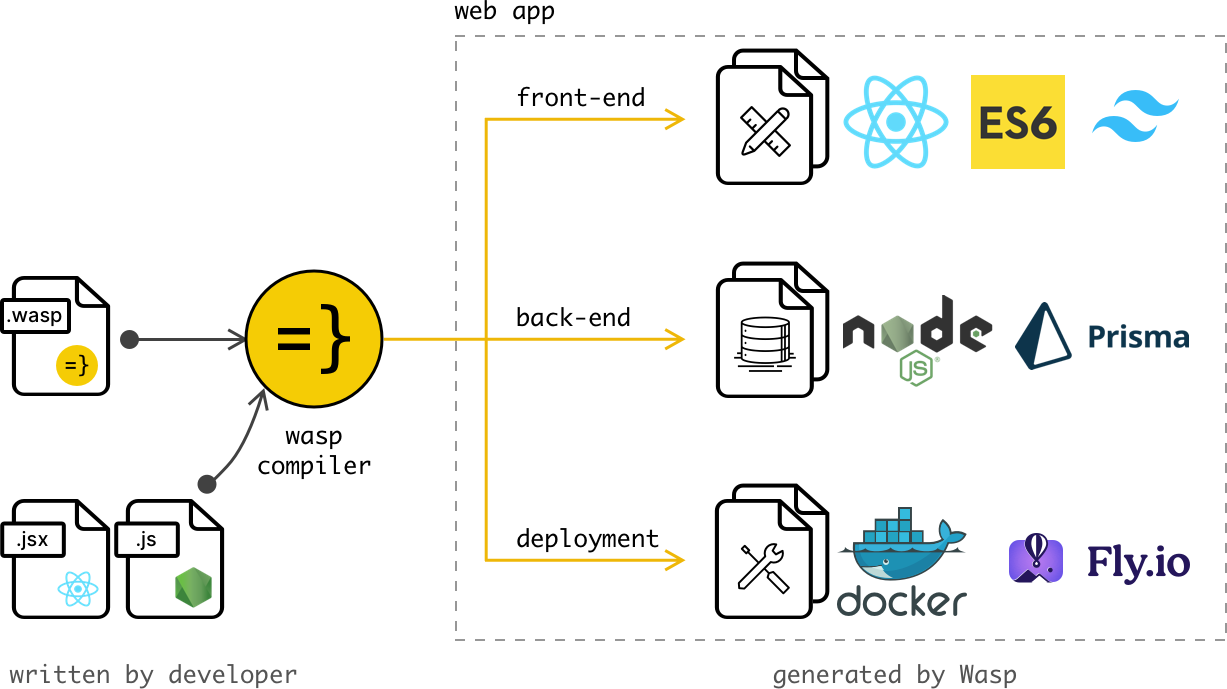
It is an opinionated way of building full-stack web applications. It takes care of all three major parts of a web application: client (front-end), server (back-end) and database.
Works well with your existing stack
Wasp is not trying to do everything at once but rather focuses on the complexity that arises from connecting all the parts of the stack (client, server, database, deployment).
Wasp is using React, Node.js and Prisma under the hood and relies on them to define web components and server queries and actions.
Wasp's secret sauce
At the core is the Wasp compiler which takes the Wasp config and your Javascript code and outputs the client app, server app and deployment code.
The cool thing about having a compiler that understands your code is that it can do a lot of things for you.
Define your app in the Wasp config and get:
- login and signup with Auth UI components,
- full-stack type safety,
- e-mail sending,
- async processing jobs,
- React Query powered data fetching,
- security best practices,
- and more.
You don't need to write any code for these features, Wasp will take care of it for you 🤯 And what's even better, Wasp also maintains the code for you, so you don't have to worry about keeping up with the latest security best practices. As Wasp updates, so does your app.
So what does the code look like?
Let's say you want to build a web app that allows users to create and share their favorite recipes.
Let's start with the main.wasp file: it is the central file of your app, where you describe the app from the high level.
Let's give our app a title and let's immediately turn on the full-stack authentication via username and password:
app RecipeApp {
  title: "My Recipes",
  wasp: { version: "^0.17.0" },
  auth: {
    methods: { usernameAndPassword: {} },
    onAuthFailedRedirectTo: "/login",
    userEntity: User
  }
}
Let's then add the data models for your recipes. Wasp understands and uses the models from the schema.prisma file. We will want to have Users and Users can own Recipes:
...

// Data models are defined using Prisma Schema Language.
model User {
  id          Int @id @default(autoincrement())
  recipes     Recipe[]
}

model Recipe {
  id          Int @id @default(autoincrement())
  title       String
  description String?
  userId      Int
  user        User @relation(fields: [userId], references: [id])
}
Next, let's define how to do something with these data models!
We do that by defining Operations, in this case, a Query getRecipes and Action addRecipe,
which are in their essence Node.js functions that execute on the server and can, thanks to Wasp, very easily be called from the client.
First, we define these Operations in our main.wasp file, so Wasp knows about them and can "beef them up":
// Queries have automatic cache invalidation and are type-safe.
query getRecipes {
  fn: import { getRecipes } from "@src/recipe/operations",
  entities: [Recipe],
}

// Actions are type-safe and can be used to perform side-effects.
action addRecipe {
  fn: import { addRecipe } from "@src/recipe/operations",
  entities: [Recipe],
}
... and then implement them in our Javascript (or TypeScript) code (we show just the query here, using TypeScript):
// Wasp generates the types for you.
import { type GetRecipes } from "wasp/server/operations";
import { type Recipe } from "wasp/entities";

export const getRecipes: GetRecipes<{}, Recipe[]> = async (_args, context) => {
  return context.entities.Recipe.findMany( // Prisma query
    { where: { user: { id: context.user.id } } }
  );
};

export const addRecipe ...
Now we can very easily use these in our React components!
For the end, let's create a home page of our app.
First, we define it in main.wasp:
...

route HomeRoute { path: "/", to: HomePage }
page HomePage {
  component: import { HomePage } from "@src/pages/HomePage",
  authRequired: true // Will send user to /login if not authenticated.
}
and then implement it as a React component in JS/TS (that calls the Operations we previously defined):
import { useQuery, getRecipes } from 'wasp/client/operations'
import { type User } from 'wasp/entities'

export function HomePage({ user }: { user: User }) {
  // Due to full-stack type safety, `recipes` will be of type `Recipe[]` here.
  const { data: recipes, isLoading } = useQuery(getRecipes) // Calling our query here!

  if (isLoading) {
    return <div>Loading...</div>
  }

  return (
    <div>
      <h1>Recipes</h1>
      <ul>
        {recipes
          ? recipes.map((recipe) => (
              <li key={recipe.id}>
                <div>{recipe.title}</div>
                <div>{recipe.description}</div>
              </li>
            ))
          : 'No recipes defined yet!'}
      </ul>
    </div>
  )
}
And voila! We are listing all the recipes in our app 🎉
This was just a quick example to give you a taste of what Wasp is. For step by step tour through the most important Wasp features, check out the Todo app tutorial.
Above we skipped defining /login and /signup pages to keep the example a bit shorter, but those are very simple to do by using Wasp's Auth UI feature.
When to use Wasp
Wasp addresses the same core problems that typical web app frameworks are addressing, and it in big part looks, swims and quacks like a web app framework.
Best used for
- building full-stack web apps (like e.g. Airbnb or Asana)
- quickly starting a web app with industry best practices
- to be used alongside modern web dev stack (React and Node.js are currently supported)
Avoid using Wasp for
- building static/presentational websites
- to be used as a no-code solution
- to be a solve-it-all tool in a single language
Wasp is a DSL
You don't need to know what a DSL is to use Wasp, but if you are curious, you can read more about it below.
Wasp does not match typical expectations of a web app framework: it is not a set of libraries, it is instead a simple programming language that understands your code and can do a lot of things for you.
Wasp is a programming language, but a specific kind: it is specialized for a single purpose: building modern web applications. We call such languages DSLs (Domain Specific Language).
Other examples of DSLs that are often used today are e.g. SQL for databases and HTML for web page layouts. The main advantage and reason why DSLs exist is that they need to do only one task (e.g. database queries) so they can do it well and provide the best possible experience for the developer.
The same idea stands behind Wasp - a language that will allow developers to build modern web applications with 10x less code and less stack-specific knowledge.