6. Modifying Data
In the previous section, you learned about using Queries to fetch data. Let's now learn about Actions so you can add and update tasks in the database.
In this section, you will create:
- A Wasp Action that creates a new task.
- A React form that calls that Action when the user creates a task.
Creating a New Action
Creating an Action is very similar to creating a Query.
Declaring an Action
We must first declare the Action in main.wasp:
// ...

action createTask {
  fn: import { createTask } from "@src/actions",
  entities: [Task]
}
Implementing an Action
Let's now define a function for our createTask Action:
- JavaScript
- TypeScript
export const createTask = async (args, context) => {
  return context.entities.Task.create({
    data: { description: args.description },
  });
};
import type { Task } from "wasp/entities";
import type { CreateTask } from "wasp/server/operations";

type CreateTaskPayload = Pick<Task, "description">;

export const createTask: CreateTask<CreateTaskPayload, Task> = async (
  args,
  context,
) => {
  return context.entities.Task.create({
    data: { description: args.description },
  });
};
We put the function in a new file src/actions.ts, but we could have put it anywhere we wanted! There are no limitations here, as long as the declaration in the Wasp file imports it correctly and the file is located within src directory.
Invoking the Action on the Client
Start by defining a form for creating new tasks.
- JavaScript
- TypeScript
import {
  createTask,
  getTasks,
  useQuery,
} from "wasp/client/operations";

// ... MainPage, TaskView, TaskList ...

const NewTaskForm = () => {
  const handleSubmit = async (event) => {
    event.preventDefault();
    try {
      const target = event.target;
      const description = target.description.value;
      target.reset();
      await createTask({ description });
    } catch (err) {
      window.alert("Error: " + err.message);
    }
  };

  return (
    <form onSubmit={handleSubmit}>
      <input name="description" type="text" defaultValue="" />
      <input type="submit" value="Create task" />
    </form>
  );
};
import type { FormEvent } from "react";
import type { Task } from "wasp/entities";
import {
  createTask,
  getTasks,
  useQuery,
} from "wasp/client/operations";

// ... MainPage, TaskView, TaskList ...

const NewTaskForm = () => {
  const handleSubmit = async (event: FormEvent<HTMLFormElement>) => {
    event.preventDefault();
    try {
      const target = event.target as HTMLFormElement;
      const description = target.description.value;
      target.reset();
      await createTask({ description });
    } catch (err: any) {
      window.alert("Error: " + err.message);
    }
  };

  return (
    <form onSubmit={handleSubmit}>
      <input name="description" type="text" defaultValue="" />
      <input type="submit" value="Create task" />
    </form>
  );
};
Unlike Queries, you can call Actions directly (without wrapping them in a hook) because they don't need reactivity. The rest is just regular React code.
All that's left now is adding this form to the page component:
- JavaScript
- TypeScript
import { createTask, getTasks, useQuery } from "wasp/client/operations";

const MainPage = () => {
  const { data: tasks, isLoading, error } = useQuery(getTasks);

  return (
    <div>
      <NewTaskForm />
      {tasks && <TasksList tasks={tasks} />}
      {isLoading && "Loading..."}
      {error && "Error: " + error}
    </div>
  );
};

// ... TaskList, TaskView, NewTaskForm ...
import type { FormEvent } from "react";
import type { Task } from "wasp/entities";
import { createTask, getTasks, useQuery } from "wasp/client/operations";

const MainPage = () => {
  const { data: tasks, isLoading, error } = useQuery(getTasks);

  return (
    <div>
      <NewTaskForm />
      {tasks && <TasksList tasks={tasks} />}
      {isLoading && "Loading..."}
      {error && "Error: " + error}
    </div>
  );
};

// ... TaskList, TaskView, NewTaskForm ...
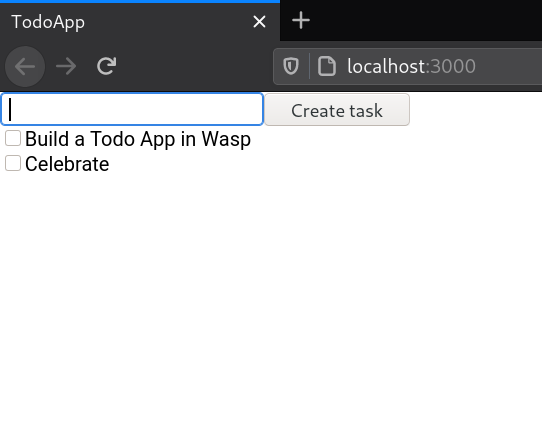
Great work!
You now have a form for creating new tasks.
Try creating a "Build a Todo App in Wasp" task and see it appear in the list below. The task is created on the server and saved in the database.
Try refreshing the page or opening it in another browser. You'll see the tasks are still there!
When you create a new task, the list of tasks is automatically updated to display the new task, even though you haven't written any code that does that! Wasp handles these automatic updates under the hood.
When you declared the getTasks and createTask operations, you specified that they both use the Task entity. So when createTask is called, Wasp knows that the data getTasks fetches may have changed and automatically updates it in the background. This means that out of the box, Wasp keeps all your queries in sync with any changes made through Actions.
This behavior is convenient as a default but can cause poor performance in large apps. While there is no mechanism for overriding this behavior yet, it is something that we plan to include in Wasp in the future. This feature is tracked here.
A Second Action
Our Todo app isn't finished if you can't mark a task as done.
We'll create a new Action to update a task's status and call it from React whenever a task's checkbox is toggled.
Since we've already created one task together, try to create this one yourself. It should be an Action named updateTask that receives the task's id and its isDone status. You can see our implementation below.
Solution
Declaring the Action in main.wasp:
// ...

action updateTask {
  fn: import { updateTask } from "@src/actions",
  entities: [Task]
}
Implementing the Action on the server:
- JavaScript
- TypeScript
// ...

export const updateTask = async ({ id, isDone }, context) => {
  return context.entities.Task.update({
    where: { id },
    data: {
      isDone: isDone,
    },
  });
};
import type { CreateTask, UpdateTask } from "wasp/server/operations";

// ...

type UpdateTaskPayload = Pick<Task, "id" | "isDone">;

export const updateTask: UpdateTask<UpdateTaskPayload, Task> = async (
  { id, isDone },
  context,
) => {
  return context.entities.Task.update({
    where: { id },
    data: {
      isDone: isDone,
    },
  });
};
You can now call updateTask from the React component:
- JavaScript
- TypeScript
import {
  updateTask,
  createTask,
  getTasks,
  useQuery,
} from "wasp/client/operations";

// ... MainPage ...

const TaskView = ({ task }) => {
  const handleIsDoneChange = async (event) => {
    try {
      await updateTask({
        id: task.id,
        isDone: event.target.checked,
      });
    } catch (error) {
      window.alert("Error while updating task: " + error.message);
    }
  };

  return (
    <div>
      <input
        type="checkbox"
        id={String(task.id)}
        checked={task.isDone}
        onChange={handleIsDoneChange}
      />
      {task.description}
    </div>
  );
};

// ... TaskList, NewTaskForm ...
import type { FormEvent, ChangeEvent } from "react";
import type { Task } from "wasp/entities";
import {
  updateTask,
  createTask,
  getTasks,
  useQuery,
} from "wasp/client/operations";

// ... MainPage ...

const TaskView = ({ task }: { task: Task }) => {
  const handleIsDoneChange = async (event: ChangeEvent<HTMLInputElement>) => {
    try {
      await updateTask({
        id: task.id,
        isDone: event.target.checked,
      });
    } catch (error: any) {
      window.alert("Error while updating task: " + error.message);
    }
  };

  return (
    <div>
      <input
        type="checkbox"
        id={String(task.id)}
        checked={task.isDone}
        onChange={handleIsDoneChange}
      />
      {task.description}
    </div>
  );
};

// ... TaskList, NewTaskForm ...
Awesome! You can now mark this task as done.
It's time to make one final addition to your app: supporting multiple users.