Deploying Manually
This document explains how to build and prepare your Wasp app for deployment. You can then deploy the built Wasp app wherever and however you want, as long as your provider/server supports Wasp's build format.
After going through the general steps that apply to all deployments, you can follow step-by-step guides for deploying your Wasp app to the most popular providers:
No worries, you can still deploy your app if your desired provider isn't on the list - it just means we don't yet have a step-by-step guide for you to follow. Feel free to open a PR if you'd like to write one yourself :)
Deploying a Wasp App
Deploying a Wasp app comes down to the following:
- Generating deployable code.
- Deploying the API server (backend).
- Deploying the web client (frontend).
- Deploying a PostgreSQL database and keeping it running.
Let's go through each of these steps.
1. Generating Deployable Code
Running the command wasp build generates deployable code for the whole app in the .wasp/build/ directory.
wasp build
You won't be able to build the app if you are using SQLite as a database (which is the default database). You'll have to switch to PostgreSQL before deploying to production.
2. Deploying the API Server (backend)
There's a Dockerfile that defines an image for building the server in the .wasp/build directory.
To run the server in production, deploy this Docker image to a hosting provider and ensure the required environment variables on the provider are correctly set up (the mechanism of setting these up is specific per provider). All necessary environment variables are listed in the next section.
Environment Variables
Here are the environment variables your server will be looking for:
DATABASE_URLrequiredThe URL of the PostgreSQL database you want your app to use (e.g.,
postgresql://mydbuser:mypass@localhost:5432/nameofmydb).WASP_WEB_CLIENT_URLrequiredThe URL where you plan to deploy your frontend app is running (e.g.,
https://<app-name>.netlify.app). The server needs to know about it to properly configure Same-Origin Policy (CORS) headers.WASP_SERVER_URLrequiredThe URL where the server is running (e.g.,
https://<app-name>.fly.dev). The server needs it to properly redirect users when logging in with OAuth providers like Google or GitHub.JWT_SECRET(required if using Wasp Auth)You only need this environment variable if you're using Wasp's
authfeatures. Set it to a random string at least 32 characters long (you can use an online generator).PORTThe server's HTTP port number. This is where the server listens for requests (default:
3001).
While these are the general instructions on deploying the server anywhere, we also have more detailed instructions for chosen providers below, so check that out for more guidance if you are deploying to one of those providers.
3. Deploying the Web Client (frontend)
To build the web app, position yourself in .wasp/build/web-app directory:
cd .wasp/build/web-app
Run
npm install && REACT_APP_API_URL=<url_to_wasp_backend> npm run build
where <url_to_wasp_backend> is the URL of the Wasp server that you previously deployed.
Remember, if you have manually defined any other client-side environment variables in your project, make sure to add them to the command above when building your client
The command above will build the web client and put it in the build/ directory in the .wasp/build/web-app/.
This is also the moment to provide any additional env vars for the client code, next to REACT_APP_API_URL. Check the env vars docs for more details.
Since the result of building is just a bunch of static files, you can now deploy your web client to any static hosting provider (e.g. Netlify, Cloudflare, ...) by deploying the contents of .wasp/build/web-app/build/.
4. Deploying the Database
Any PostgreSQL database will do, as long as you provide the server with the correct DATABASE_URL env var and ensure that the database is accessible from the server.
Different Providers
We'll cover a few different deployment providers below:
- Fly.io (server and database)
- Netlify (client)
- Railway (server, client and database)
- Heroku (server and database)
Fly.io (server and database)
We will show how to deploy the server and provision a database for it on Fly.io.
If you want to do all of the work below with one command, you can use the Wasp CLI.
Wasp CLI deploys the server, deploys the client, and sets up a database. It also gives you a way to redeploy (update) your app with a single command.
Fly.io offers a variety of free services that are perfect for deploying your first Wasp app! You will need a Fly.io account and the flyctl CLI.
Fly.io offers support for both locally built Docker containers and remotely built ones. However, for simplicity and reproducibility, we will default to the use of a remote Fly.io builder.
Additionally, fly is a symlink for flyctl on most systems and they can be used interchangeably.
Make sure you are logged in with flyctl CLI. You can check if you are logged in with flyctl auth whoami, and if you are not, you can log in with flyctl auth login.
Set Up a Fly.io App
You need to do this only once per Wasp app.
Unless you already have a Fly.io app that you want to deploy to, let's create a new Fly.io app.
After you have built the app, position yourself in .wasp/build/ directory:
cd .wasp/build
Next, run the launch command to set up a new app and create a fly.toml file:
flyctl launch --remote-only
This will ask you a series of questions, such as asking you to choose a region and whether you'd like a database.
Say yes to Would you like to set up a PostgreSQL database now? and select Development. Fly.io will set a
DATABASE_URLfor you.Say no to Would you like to deploy now? (and to any additional questions).
We still need to set up several environment variables.
If your attempts to initiate a new app fail for whatever reason, then you should run flyctl apps destroy <app-name> before trying again. Fly does not allow you to create multiple apps with the same name.
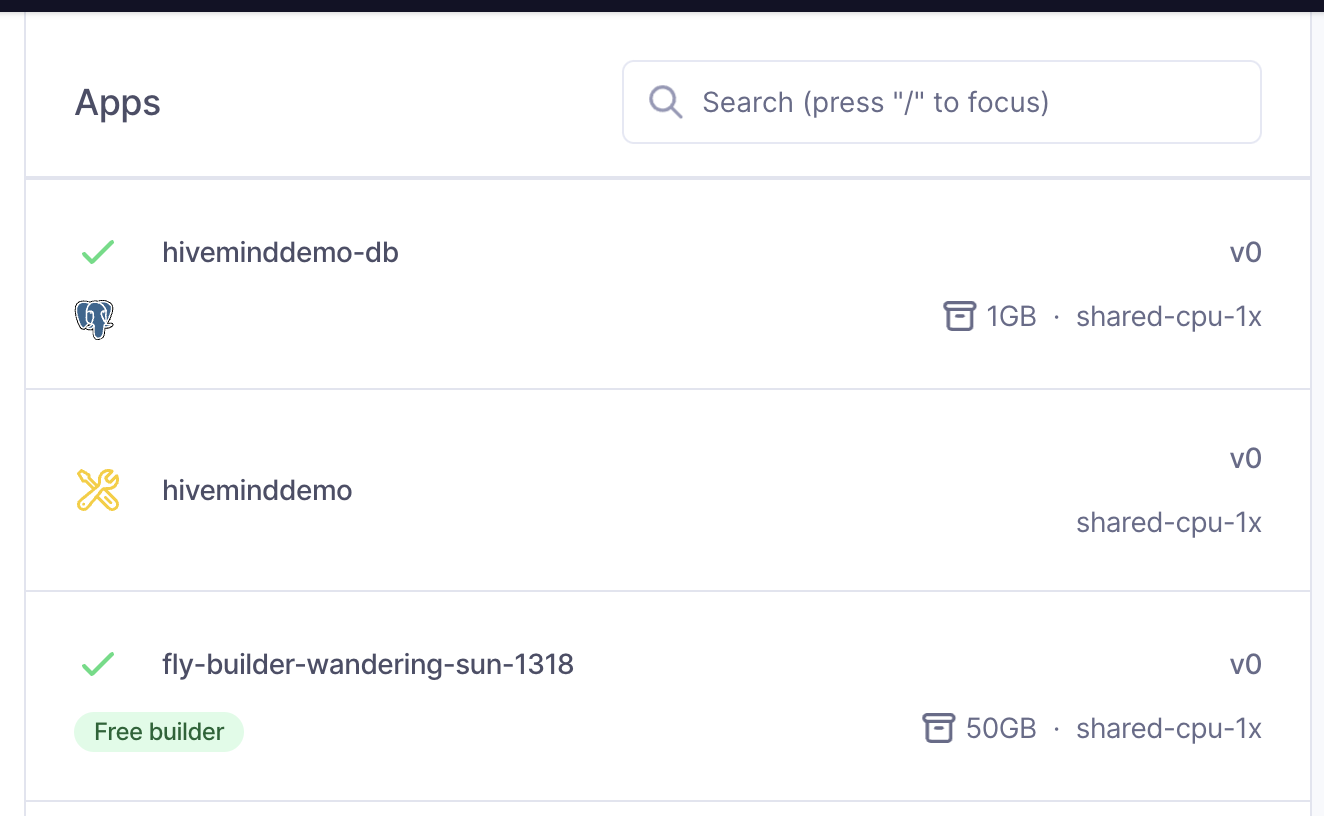
What does it look like when your DB is deployed correctly?
When your DB is deployed correctly, you'll see it in the Fly.io dashboard:
Next, let's copy the fly.toml file up to our Wasp project dir for safekeeping.
cp fly.toml ../../
Next, add a few more environment variables for the server code.
flyctl secrets set PORT=8080
flyctl secrets set JWT_SECRET=<random_string_at_least_32_characters_long>
flyctl secrets set WASP_WEB_CLIENT_URL=<url_of_where_client_will_be_deployed>
flyctl secrets set WASP_SERVER_URL=<url_of_where_server_will_be_deployed>
If you do not know what your client URL is yet, don't worry. You can set WASP_WEB_CLIENT_URL after you deploy your client.
If you want to make sure you've added your secrets correctly, run flyctl secrets list in the terminal. Note that you will see hashed versions of your secrets to protect your sensitive data.
Deploy to a Fly.io App
While still in the .wasp/build/ directory, run:
flyctl deploy --remote-only --config ../../fly.toml
This will build and deploy the backend of your Wasp app on Fly.io to https://<app-name>.fly.dev 🤘🎸
Now, if you haven't, you can deploy your client and add the client URL by running flyctl secrets set WASP_WEB_CLIENT_URL=<url_of_deployed_client>. We suggest using Netlify for your client, but you can use any static hosting provider.
Additionally, some useful flyctl commands:
flyctl logs
flyctl secrets list
flyctl ssh console
Redeploying After Wasp Builds
When you rebuild your Wasp app (with wasp build), it will remove your .wasp/build/ directory. In there, you may have a fly.toml from any prior Fly.io deployments.
While we will improve this process in the future, in the meantime, you have a few options:
Copy the
fly.tomlfile to a versioned directory, like your Wasp project dir.From there, you can reference it in
flyctl deploy --config <path>commands, like above.Backup the
fly.tomlfile somewhere before runningwasp build, and copy it into .wasp/build/ after.When the
fly.tomlfile exists in .wasp/build/ dir, you do not need to specify the--config <path>.Run
flyctl config save -a <app-name>to regenerate thefly.tomlfile from the remote state stored in Fly.io.
Netlify (client)
We'll show how to deploy the client on Netlify.
Netlify is a static hosting solution that is free for many use cases. You will need a Netlify account and Netlify CLI installed to follow these instructions.
Make sure you are logged in with Netlify CLI. You can check if you are logged in with netlify status, and if you are not, you can log in with netlify login.
First, make sure you have built the Wasp app. We'll build the client web app next.
To build the web app, position yourself in .wasp/build/web-app directory:
cd .wasp/build/web-app
Run
npm install && REACT_APP_API_URL=<url_to_wasp_backend> npm run build
where <url_to_wasp_backend> is the URL of the Wasp server that you previously deployed.
Remember, if you have manually defined any other client-side environment variables in your project, make sure to add them to the command above when building your client
We can now deploy the client with:
netlify deploy
Carefully follow the instructions i.e. do you want to create a new app or use an existing one, the team under which your app will reside etc.
The final step is to run:
netlify deploy --prod
That is it! Your client should be live at https://<app-name>.netlify.app ✨
Make sure you set this URL as the WASP_WEB_CLIENT_URL environment variable in your server hosting environment (e.g., Fly.io or Heroku).
Railway (server, client and database)
We will show how to deploy the client, the server, and provision a database on Railway.
Railway is a simple and great way to host your server and database. It's also possible to deploy your entire app: database, server, and client. You can use the platform for free for a limited time, or if you meet certain eligibility requirements. See their plans page for more info.
Prerequisites
To get started, follow these steps:
Make sure your Wasp app is built by running
wasp buildin the project dir.Create a Railway account
Free TierSign up with your GitHub account to be eligible for the free tier
Install the Railway CLI
Run
railway loginand a browser tab will open to authenticate you.
Create New Project
Let's create our Railway project:
- Go to your Railway dashboard, click on New Project, and select
Provision PostgreSQLfrom the dropdown menu. - Once it initializes, right-click on the New button in the top right corner and select Empty Service.
- Once it initializes, click on it, go to Settings > General and change the name to
server - Go ahead and create another empty service and name it
client
Deploy Your App to Railway
Setup Domains
We'll need the domains for both the server and client services:
- Go to the
serverinstance'sSettingstab, and clickGenerate Domain. - Do the same under the
client'sSettings.
Copy the domains as we will need them later.
Deploying the Server
Let's deploy our server first:
Move into your app's
.wasp/build/directory:cd .wasp/buildLink your app build to your newly created Railway project:
railway linkGo into the Railway dashboard and set up the required env variables:
Open the
Settingsand go to theVariablestab:click Variable reference and select
DATABASE_URL(it will populate it with the correct value)add
WASP_WEB_CLIENT_URL- enter theclientdomain (e.g.https://client-production-XXXX.up.railway.app).https://prefix is required!add
WASP_SERVER_URL- enter theserverdomain (e.g.https://server-production-XXXX.up.railway.app).https://prefix is required!add
JWT_SECRET- enter a random string at least 32 characters long (use an online generator)
Push and deploy the project:
railway up
Select server when prompted with Select Service.
Railway will now locate the Dockerfile and deploy your server 👍
Deploying the Client
Next, change into your app's frontend build directory
.wasp/build/web-app:cd web-appCreate the production build, using the
serverdomain as theREACT_APP_API_URL:npm install && REACT_APP_API_URL=<url_to_wasp_backend> npm run buildNext, we want to link this specific frontend directory to our project as well:
railway linkWe need to configure Railway's static hosting for our client.
Setting Up Static HostingCopy the
buildfolder within theweb-appdirectory todist:cp -r build distWe'll need to create the following files:
Dockerfilewith:DockerfileFROM pierrezemb/gostatic
CMD [ "-fallback", "index.html" ]
COPY ./dist/ /srv/http/.dockerignorewith:.dockerignorenode_modules/
You'll need to repeat these steps each time you run
wasp buildas it will remove the.wasp/build/web-appdirectory.Here's a useful shell script to do the process
If you want to automate the process, save the following as
deploy_client.shin the root of your project:deploy_client.sh#!/usr/bin/env bash
if [ -z "$REACT_APP_API_URL" ]
then
echo "REACT_APP_API_URL is not set"
exit 1
fi
wasp build
cd .wasp/build/web-app
npm install && REACT_APP_API_URL=$REACT_APP_API_URL npm run build
cp -r build dist
dockerfile_contents=$(cat <<EOF
FROM pierrezemb/gostatic
CMD [ "-fallback", "index.html" ]
COPY ./dist/ /srv/http/
EOF
)
dockerignore_contents=$(cat <<EOF
node_modules/
EOF
)
echo "$dockerfile_contents" > Dockerfile
echo "$dockerignore_contents" > .dockerignore
railway upMake it executable with:
chmod +x deploy_client.shYou can run it with:
REACT_APP_API_URL=<url_to_wasp_backend> ./deploy_client.shSet the
PORTenvironment variable to8043under theVariablestab.Once set, deploy the client and select
clientwhen prompted withSelect Service:
railway up
Conclusion
And now your Wasp should be deployed! 🐝 🚂 🚀
Back in your Railway dashboard, click on your project and you should see your newly deployed services: PostgreSQL, Server, and Client.
Updates & Redeploying
When you make updates and need to redeploy:
- run
wasp buildto rebuild your app - run
railway upin the.wasp/builddirectory (server) - repeat all the steps in the
.wasp/build/web-appdirectory (client)
Heroku (server and database)
We will show how to deploy the server and provision a database for it on Heroku.
Heroku used to offer free apps under certain limits. However, as of November 28, 2022, they ended support for their free tier. https://blog.heroku.com/next-chapter
As such, we recommend using an alternative provider like Fly.io for your first apps.
You will need Heroku account, heroku CLI and docker CLI installed to follow these instructions.
Make sure you are logged in with heroku CLI. You can check if you are logged in with heroku whoami, and if you are not, you can log in with heroku login.
Set Up a Heroku App
You need to do this only once per Wasp app.
Unless you want to deploy to an existing Heroku app, let's create a new Heroku app:
heroku create <app-name>
Unless you have an external PostgreSQL database that you want to use, let's create a new database on Heroku and attach it to our app:
heroku addons:create --app <app-name> heroku-postgresql:mini
Heroku does not offer a free plan anymore and mini is their cheapest database instance - it costs $5/mo.
Heroku will also set DATABASE_URL env var for us at this point. If you are using an external database, you will have to set it up yourself.
The PORT env var will also be provided by Heroku, so the ones left to set are the JWT_SECRET, WASP_WEB_CLIENT_URL and WASP_SERVER_URL env vars:
heroku config:set --app <app-name> JWT_SECRET=<random_string_at_least_32_characters_long>
heroku config:set --app <app-name> WASP_WEB_CLIENT_URL=<url_of_where_client_will_be_deployed>
heroku config:set --app <app-name> WASP_SERVER_URL=<url_of_where_server_will_be_deployed>
If you do not know what your client URL is yet, don't worry. You can set WASP_WEB_CLIENT_URL after you deploy your client.
Deploy to a Heroku App
After you have built the app, position yourself in .wasp/build/ directory:
cd .wasp/build
assuming you were at the root of your Wasp project at that moment.
Log in to Heroku Container Registry:
heroku container:login
Build the docker image and push it to Heroku:
heroku container:push --app <app-name> web
App is still not deployed at this point. This step might take some time, especially the very first time, since there are no cached docker layers.
Apple Silicon users need to build a non-Arm image, so the above step will not work at this time. Instead of heroku container:push, users instead should:
docker buildx build --platform linux/amd64 -t <app-name> .
docker tag <app-name> registry.heroku.com/<app-name>/web
docker push registry.heroku.com/<app-name>/web
You are now ready to proceed to the next step.
Deploy the pushed image and restart the app:
heroku container:release --app <app-name> web
This is it, the backend is deployed at https://<app-name>-XXXX.herokuapp.com 🎉
Find out the exact app URL with:
heroku info --app <app-name>
Additionally, you can check out the logs with:
heroku logs --tail --app <app-name>
pg-boss with HerokuIf you wish to deploy an app leveraging Jobs that use pg-boss as the executor to Heroku, you need to set an additional environment variable called PG_BOSS_NEW_OPTIONS to {"connectionString":"<REGULAR_HEROKU_DATABASE_URL>","ssl":{"rejectUnauthorized":false}}. This is because pg-boss uses the pg extension, which does not seem to connect to Heroku over SSL by default, which Heroku requires. Additionally, Heroku uses a self-signed cert, so we must handle that as well.
Read more: https://devcenter.heroku.com/articles/connecting-heroku-postgres#connecting-in-node-js
Koyeb (server, client and database)
Check out the tutorial made by the team at Koyeb for detailed instructions on how to deploy a whole Wasp app on Koyeb: Using Wasp to Build Full-Stack Web Applications on Koyeb.
The tutorial was written for Wasp v0.13.