A Guide to Windows Development with Wasp & WSL


If you are having a hard time with Wasp development on Windows, don't be afraid! We will go through all necessary steps to set up your dev environment and get you started with Wasp development in Windows in no time.
What is WSL and why should I be interested in it?
Windows Subsystem for Linux (or WSL) lets developers run a fully functional and native GNU/Linux environment directly on Windows. In other words, we can run Linux directly without using a virtual machine or dual-booting the system.
The first cool thing about it is that WSL allows you to never switch OS’s, but still have the best of both worlds inside your OS. What does that mean for us regular users? When you look at the way WSL works in practice, it can be considered a Windows feature that runs a Linux OS directly inside Windows 10 or 11, with a fully functional Linux file system, Linux command line tools, and Linux GUI apps (really cool, btw). Besides that, it uses much fewer resources for running when compared to a virtual machine and also doesn’t require a separate tool for creating and managing those virtual machines.
WSL is mainly catered to developers, so this article will be focused on developer usage and how to set up a fully working dev environment with VS Code. Inside this article, we’ll go through some of the cool features and how they can be used in practice. Plus, the best way to understand new things is to actually start using them.
Installing WSL on the Windows operating system
In order to install WSL on your Windows, first enable Hyper-V architecture is Microsoft’s hardware virtualization solution. To install it, right-click on the Windows Terminal/Powershell and open it in Administrator mode.
Then, run the following command:
Enable-WindowsOptionalFeature -Online -FeatureName Microsoft-Hyper-V -All
That will ensure that you have all the prerequisites for the installation. Then, open the Powershell (best done in Windows Terminal) in the Administrator mode. Then, run
wsl —install
There is a plethora of Linux distributions to be installed, but Ubuntu is the one installed by default. This guide will feature many console commands, but most of them will be a copy-paste process.
If you have installed Docker before, there is a decent chance that you have WSL 2 installed on your system already. In that case, you will get a prompt to install the distribution of your choice. Since this tutorial will be using Ubuntu, I suggest running.
wsl --install -d Ubuntu
After installing Ubuntu (or another distro of your choice), you will enter your Linux OS and be prompted with a welcome screen. There, you will enter some basic info. First, you will enter your username and after that your password. Both of those will be Linux-specific, so you don’t necessarily have to repeat your Windows credentials. After we’ve done this, the installation part is over! You have successfully installed Ubuntu on your Windows machine! It still feels weird to say this, right?
Cool WSL featues to help you along the way
But before we get down to our dev environment setup, I want to show you a couple of cool tricks that will make your life easier and help you understand why WSL is actually a game-changer for Windows users.
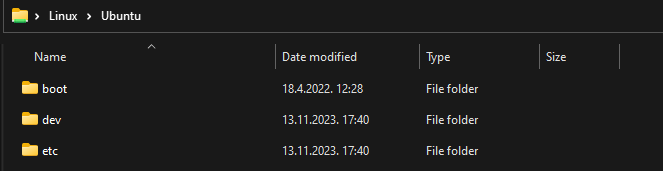
The first cool thing with WSL is that you don’t have to give up the current way of managing files through Windows Explorer. In your sidebar in Windows Explorer, you can find the Linux option now right under the network tab.
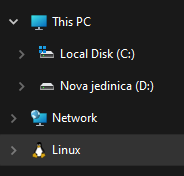
From there, you can access and manage your Linux OS’s file system directly from the Windows Explorer. What is really cool with this feature is that you can basically copy, paste, and move files between different operating systems without any issues, which opens up a whole world of possibilities. Effectively, you don’t have to change much in your workflow with files and you can move many projects and files from one OS to another effortlessly. If you download an image for your web app on your Windows browser, just copy and paste it to your Linux OS.
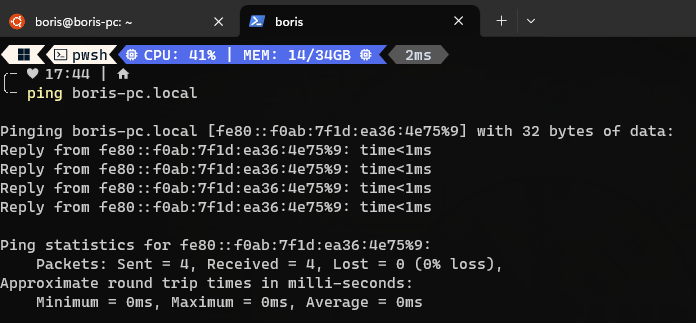
Another very important thing, which we will use in our example is WSL2 virtual routes. As you now have OS inside your OS, they have a way of communicating. When you want to access your Linux OS’s network (for example, when you want to access your web app running locally in Linux), you can use ${PC-name}.local. For me, since my PC name is Boris-PC, my network address is boris-pc.local. That way you don’t have to remember different IP addresses, which is really cool. If you want your address for whatever reason, you can go to your Linux distro’s terminal, and type ipconfig. Then, you can see your Windows IP and Linux’s IP address. With that, you can communicate with both operating systems without friction.
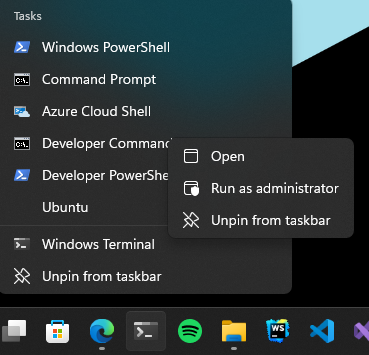
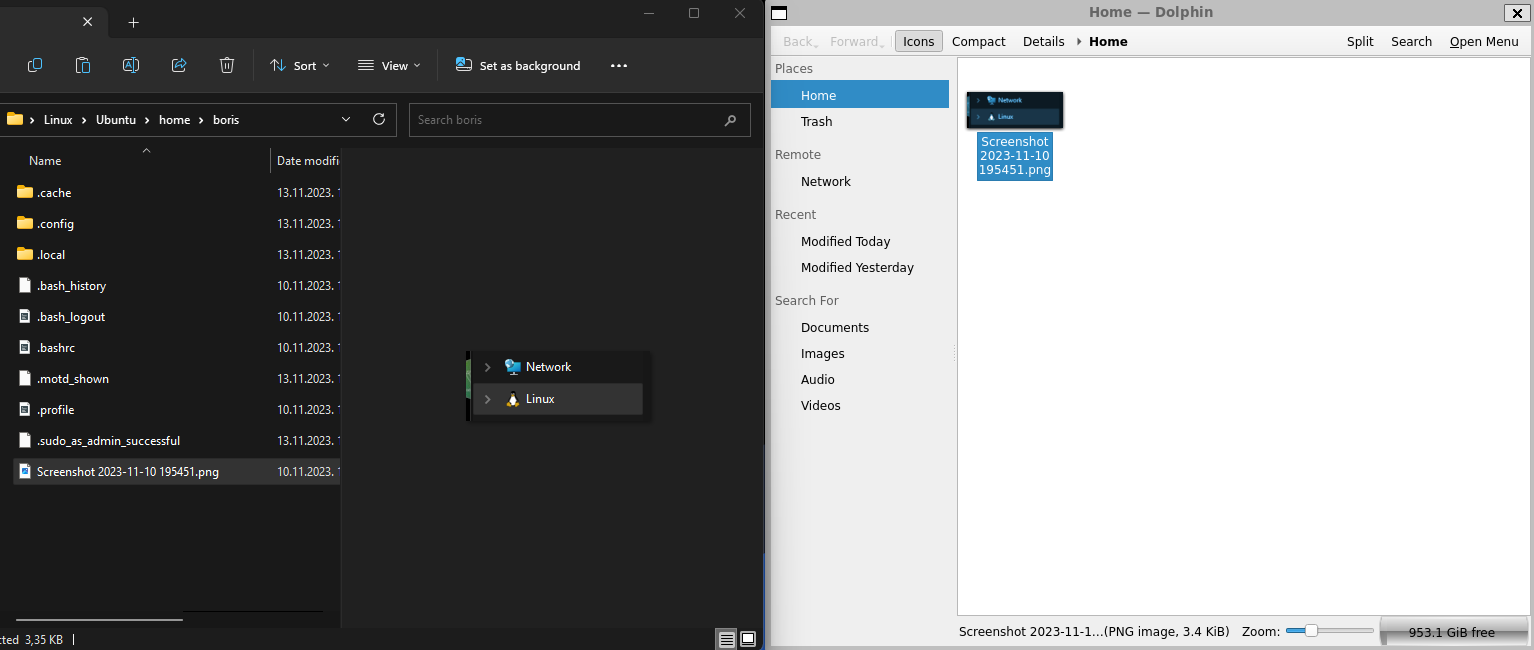
The final cool thing I want to highlight is Linux GUI apps. It is a very cool feature that helps make WSL a more attractive proposal for regular users as well. You can install any app you want on your Linux system using popular package managers, such as apt (default on Ubuntu) or flatpak. Then you can launch them as well from the command line and the app will start and be visible inside your Windows OS. But that can cause some friction and is not user-friendly. The really ground-breaking part of this feature is that you can launch them directly from your Windows OS without even starting WSL yourself. Therefore, you can create shortcuts and pin them to the Start menu or taskbar without any friction and really have no need to think about where your app comes from. For the showcase, I have installed Dolphin File Manager and run it through Windows OS. You can see it action below side by side with Windows Explorer.
Getting started with development on WSL
After hearing all about the cool features of WSL, let’s slowly get back on track with our tutorial. Next up is setting up our dev environment and starting our first app. I’ll be setting up a web dev environment and we’ll use Wasp as an example.
If you aren’t familiar with it, Wasp is a Rails-like framework for React, Node.js, and Prisma. It’s a fast and easy way to develop and deploy your full-stack web apps. For our tutorial, Wasp is a perfect candidate, since it doesn’t support Windows development natively, but only through WSL as it requires a Unix environment.
Let’s get started with installing Node.js first. NVM is the best tool for versioning Node.js, so we want to start with both Node.js and NVM installation.
But first things first, let’s start with Node.js. In WSL, run:
sudo apt install nodejs
in order to install Node on your Linux environment. Next up is NVM. I suggest going to https://github.com/nvm-sh/nvm and getting the latest install script from there. The current download is:
curl -o- https://raw.githubusercontent.com/nvm-sh/nvm/v0.39.5/install.sh | bash
After this, we have both Node.js and NVM set up in our system.
Installing Wasp
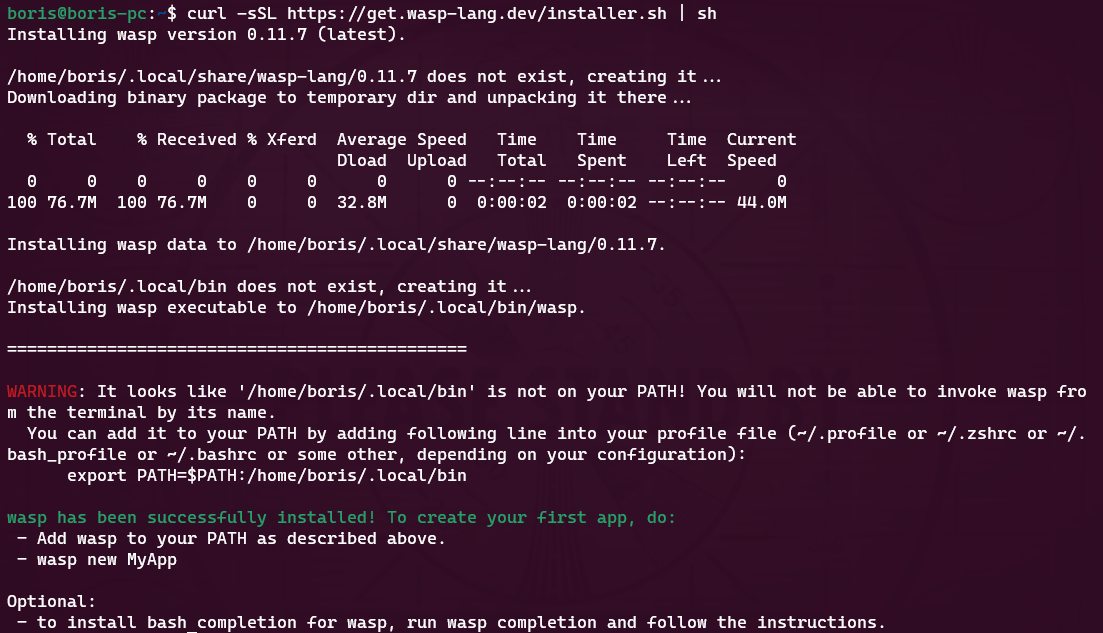
Next up is installing Wasp on our Linux environment. Wasp installation is also pretty straightforward and easy. So just copy and paste this command:
curl -sSL https://get.wasp.sh/installer.sh | sh
and wait for the installer to finish up its thing. Great! But, if you did your WSL setup from 0, you will notice the following warning underneath: It looks like '/home/boris/.local/bin' is not on your PATH! You will not be able to invoke wasp from the terminal by its name.
Let’s fix this quickly. In order to do this, let’s run
code ~/.profile
If we don’t already have VS Code, it will automatically set up everything needed and boot up so you can add the command to the end of your file. It will be different for everyone depending on their system name. For example, mine is:
export PATH=$PATH:/home/boris/.local/bin
Setting up VS Code
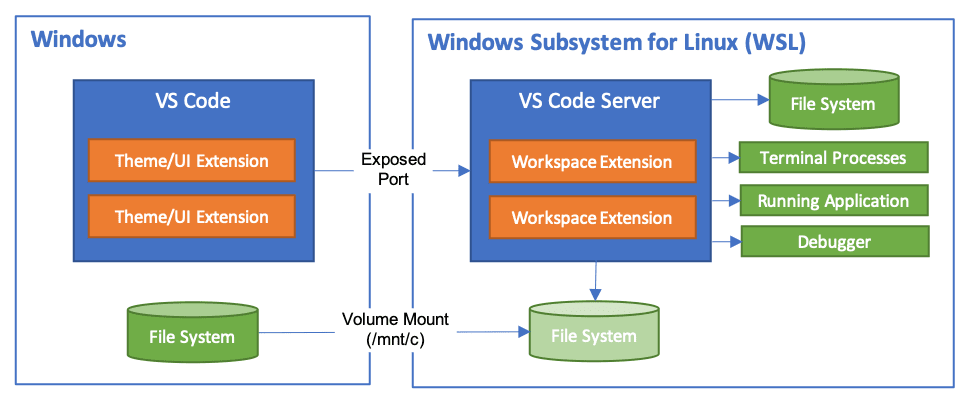
After setting up Wasp, we want to see how to run the app and access it from VS Code. Under the hood, you will still be using WSL for our development, but we’ll be able to use our VS Code from Host OS (Windows) for most of the things.
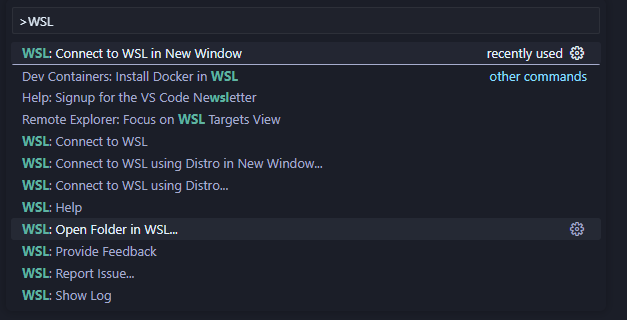
To get started, download the WSL extension to your VS Code in Windows. Afterward, let’s start a new Wasp project to see how it works in action. Open your VS Code Command Palette (ctrl + shift + P) and select the option to “Open Folder in WSL”.
The folder that I have opened is
\\wsl.localhost\Ubuntu\home\boris\Projects
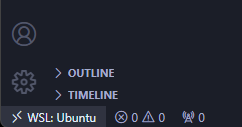
That is the “Projects” folder inside my home folder in WSL. There are 2 ways for us to know that we are in WSL: The top bar and in the bottom left corner of VS Code. In both places, we should see the text WSL: Ubuntu, as shown on screenshots.

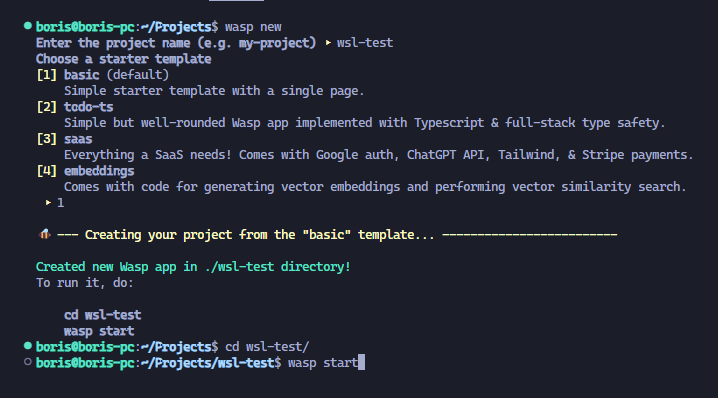
Once inside this folder, I will open a terminal. It will also be already connected to the proper folder in WSL, so we can get down to business! Let’s run the
wasp new
command to create a new Wasp application. I have chosen the basic template, but you are free to create a project of your choosing, e.g. SaaS starter with GPT, Stripe and more preconfigured. As shown in the screenshot, we should change the current directory of our project to the proper one and then run our project with it.
wasp start
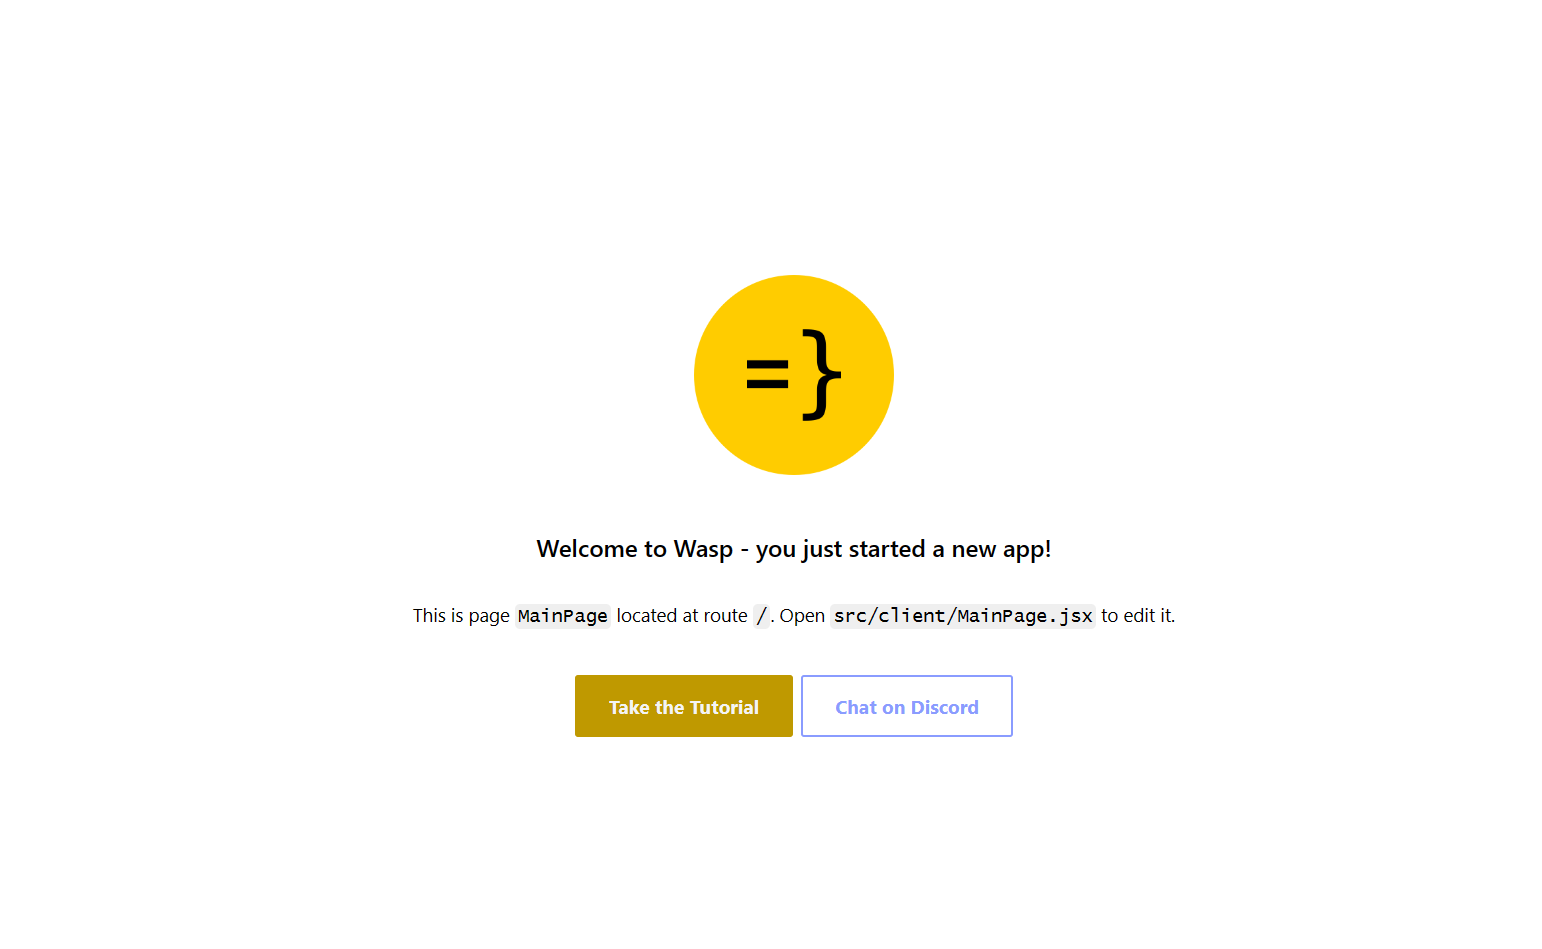
And just like that, a new screen will open on my Windows machine, showcasing that my Wasp app is open. Cool! My address is still the default localhost:3000, but it is being run from the WSL. Congratulations, you’ve successfully started your first Wasp app through WSL. That wasn’t hard, was it?
For our final topic, I want to highlight Git workflow with WSL, as it is relatively painless to set up. You can always do the manual git config setup, but I have something cooler for you: Sharing credentials between Windows and WSL. To set up sharing Git credentials, we have to do the following. In Powershell (on Windows), configure the credential manager on Windows.
git config --global credential.helper wincred
And let’s do the same inside WSL.
git config --global credential.helper "/mnt/c/Program\ Files/Git/mingw64/bin/git-credential-manager.exe"
This allows us to share our Git username and password. Anything set up in Windows will work in WSL (and vice-versa) and we can use Git inside WSL as we prefer (via VS Code GUI or via shell).
Docker post-installation steps
If you are running a PostgreSQL database locally (especially if you are using OpenSaas), it is recommended to complete those post-install steps in WSL, based on the official Docker guide. These work if you are experiencing an error similar to this: docker: Error response from daemon: Ports are not available: .......
First, run
sudo groupadd docker
command to create the docker group in case it doesn't exist. If it exists, don't worry, just continue with next steps. After that, add your current user to docker group by running
sudo usermod -aG docker $USER
where $USER is your username. After that, log out and log back in to apply the changes. Finally, run
su -s $USER
Conclusion
Through our journey here, we have learned what WSL is, how it can be useful for enhancing our workflow with our Windows PC, but also how to set up your initial development environment on it. Microsoft has done a fantastic job with this tool and has really made Windows OS a much more approachable and viable option for all developers. We went through how to install the dev tools needed to kickstart development and how to get a handle on a basic dev workflow. Here are some important links if you want to dive deeper into the topic:
- https://github.com/microsoft/WSL
- https://learn.microsoft.com/en-us/windows/wsl/install
- https://code.visualstudio.com/docs/remote/wsl